Análisis y comparativas
User Tools
Sidebar
This is an old revision of the document!
Table of Contents
OshwiPin: DIY PINS
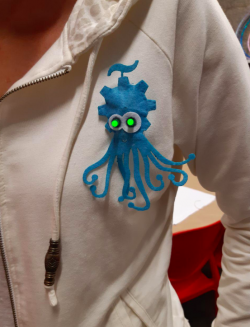
Creation of OSHWDem mascot brooches (OSHWi, the octopus) made with felt, LEDs and conductive thread, during OSHWDem 2019.
The idea is to give an introduction to e e-textiles and soft circuit basic notions for anyone who knows a lot or a little about electronics.
We will provide a kit of materials with everything necessary for its preparation, and the BricoLabs volunteers will be on hand to help you make them, so that all the participants can take them home finished.
That way, we will help to spread the image of OSHWDem and promote open source technology to the general public.
Kit Contents
- White felt eyes piece.
- Blue felt body piece.
- Black felt pupil piece.
- Battery felt bag.
- Safety pin with holes.
- Conductive thread.
- LEDs.
- Snap fasteners.
- Button battery (CR2032 3V).
- Kit bag.
- Instructions.
Other necessary materials
- Scissors.
- Big eye needles.
- Thimbles.
- Threader.
- Open seams.
- Round nose pliers.
- Extra LEDs.
- Conductive thread (bobbin).
- Normal blue thread.
- Pins and pincushions.
Realization
Assembly of the pieces.
Sewn of the safety pin.
Sewn of the electrical circuit.
Insert the cell battery.
You can see the full instructions here (spanish by now): https://drive.google.com/file/d/1GCWRxfRG0pNFzJ67yNSEldkmafNem9-4/view?usp=sharing
Tricks on sewing with the conductive thread:
- Cut the conductive thread into small pieces, because in longer ones it becomes more entangled, among other problems (entanglements, thread twist is undone, etc …) and in addition, I remember the teachings of my mother: “Long thread, small seamstress ”.
- Use thimble: “Seamstress without thimble, sew little and sew badly”. Thank you for keeping my fingertips safe, mom!
- Needle with large eye (because the thread is thicker than those of sewing fabrics), but not too much, because it does not enter through the holes of the snap fasteners.
- And needle with a fine point (because those with a round tip, as they are usually those with a large eye, do not puncture well in the tissue and make stitches difficult).
- In thick fabrics such as felt, so that the stitch is not visible on the right side of the work, it is best to sew upside down and puncture only up to half of the fabric, so it is a cleaner job on the right side.
Team members
- Conchi Fernández, coordinator. https://twitter.com/cfdezmunin
- Daniel.
- Loli Blanco. https://twitter.com/LoliBlancoC
- Xosé Pérez. https://twitter.com/XosePerezK
- Maite.
- LolyP. https://twitter.com/lolyp
- With a special thanks to Xoan Sampaíño for his solutions: https://twitter.com/xoan
- And another thanks to all the makers and all the other people who came to sew an OshwiPin with us at OSHWDem 2019 (https://oshwdem.org/makers-2019/). Love you all!
Best regards.


